Visual Studio 에서 MySQL 연결 하는 방법
비주얼 스튜디오에서 MySQL 을 연결하려면
먼저 MySQL 을 설치를 해야 한다.
다운로드는 여기서..
MySQL Installer 가 설치되어 있다면
MySQL Server 이외에도
MySQL for VIsual Studio 와
Connector/NET 을 같이 설치하면 된다.
Connector/ODBC 와 Workbench
MySQL For Excel 등도 같이 설치하면 좋다.
MySQL 설치가 끝나고, 비주얼 스튜디오를 킨다.
새로운 프로젝트를 하나 생성하고~
(가볍게 콘솔응용으로 하든지, 윈폼으로 하든지 알아서)
솔루션 탐색기를 보면
Properties 밑에
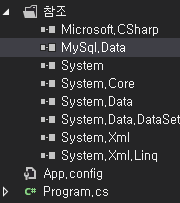
"참조" 폴더가 있는데 살펴보면
using 으로 가져다 쓰는 dll 파일이 여기 다 들었다.
Java 자바로 치면, 소스에서 Import 하는 class 파일 모음인 Package 팩키지 jar 파일이다.
기본적으로 System.* 이 있는데
여기다가 MySQL 을 추가하면 된다.
추가하는 방법은, 참조 누르고 마우스 오른쪽 버튼 클릭 > 참조 추가
어셈블리 > 확장 > MySql.Data 체크 > 확인
그리고 소스에서 아래와 같이 입력하면 MySQL 을 쓸 수 있다.
using MySQL.Data.MySQLClient;
그럼, 정말 MySQL 에 연결이 되는지 간단히 테스트를 해보자.
class Program
{
    static void Main(string[] args)
    {
        string server   = string.Empty;
        string database = string.Empty;
        string userid   = string.Empty;
        string password = string.Empty;

        Console.Write("Server : ");
        server = Console.ReadLine();

        Console.Write("Database : ");
        database = Console.ReadLine();

        Console.Write("User ID : ");
        userid = Console.ReadLine();

        Console.WriteLine("Password : ");
        password = Console.ReadLine();

        string conn = string.Format("Server={0};"
                                   +"Database={1};"
                                   +"UID={2};"
                                   +"password={3}"
                                   , server
                                   , database
                                   , userid
                                   , password
                                   );
        try
        {
            MySqlConnection connection = new MySqlConnection(conn);
            connection.Open();
            Console.WriteLine("Connection OK! Close After 10 seconds.");
            System.Threading.Thread.Sleep(10000);
            connection.Close();
        }
        catch(Exception e)
        {
            Console.WriteLine(e);
            Console.ReadKey();
        }
    }
}


댓글
댓글 쓰기